
Zoom Contact Center
Overview
The Quiq app for Zoom Contact Center connects your Zoom Contact Center account to the Quiq platform. Once installed, Quiq appears as a third-party voicebot connector inside Zoom Contact Center, so you can route inbound voice calls to a Quiq AI agent and hand those calls off to a human Zoom Contact Center agent when needed.
What the integration does
- Answers inbound Zoom Contact Center voice calls with a Quiq AI agent.
- Streams call audio between Zoom Contact Center and Quiq for the duration of the AI agent's turn.
- Posts conversation context back to Zoom over Zoom's webhook integration API — metadata, a conversation summary, and the transcript — so a human agent sees what happened before the handoff.
- Returns control to your Zoom Contact Center flow when the AI agent transfers, ends, or times out — so the call can be routed to a queue, a human agent, or another flow branch.
- Optionally passes SIP header and API values into Quiq as flow variables.
What you need before you start
| Requirement | Notes |
|---|---|
| Zoom Contact Center license | Voice channel enabled. Owner or Admin role, or a custom role with Contact Center Management and Marketplace privileges. |
| Zoom account permission to add Marketplace apps | If your account restricts app installs, an account Owner/Admin must approve or pre-approve the Quiq app. |
| A Quiq account with an AI agent configured | The integration will connect but will not answer calls until a Quiq AI agent exists on your tenant. |
| Quiq admin access | You will create a Managed Credential and an HTTP Target under AI Studio → Resources → API Resources. |
| A shared secret | A long random string that you choose. You enter it in Zoom when creating the connection, and again in Quiq. |
| Your Quiq region | See Selecting the correct region. |
| An available Zoom phone number | Or the ability to provision one under Number Management. |
Important: Adding the app from the Zoom App Marketplace does not complete setup. You must also create a connection, select your region, build a flow that uses the Quiq bot widget, and assign a phone number to that flow.
⚠️ Required: register your bot phone number with Quiq
When you select your Quiq connector in a flow's Bot widget, Zoom shows an auto-generated Phone number. You must email that number to [email protected] so Quiq can connect it to your tenant.
This is not the inbound number you assign to the flow — it is the read-only value Zoom generates for the connector. The step cannot be completed by you in either Zoom or Quiq. Until Quiq has registered it, calls will not reach your AI agent, no matter how correctly everything else is configured. See Register your bot phone number with Quiq.
Permissions and scopes requested
The Quiq app does not request any Zoom API scopes. It does not read your Zoom user directory, meetings, recordings, or chat history.
The app's access is limited to the Contact Center connector you create. Once a connection exists, call audio is exchanged between Zoom Contact Center and Quiq for calls that your own flows route to a Quiq Bot widget, and Quiq posts conversation context back to the Static URL for those calls. No other Zoom data is accessed.
For details on what Quiq stores and for how long, see https://quiq.com/privacypolicy/.
How authentication works
Quiq posts conversation context to Zoom's webhook integration API during each call. Zoom needs to know those requests really come from your Quiq tenant, so the two sides share a secret that you choose.
| Where | What you enter | Purpose |
|---|---|---|
| Zoom — connection Authorize step | A secret of your choosing, in the field labelled Quiq | What Zoom checks on incoming requests |
| Quiq — Managed Credential | The same secret, as the value of a header named zoom | What Quiq sends on every request to Zoom |
| Quiq — API Resource | Zoom's Static URL, plus the credential above | Where Quiq sends those requests |
You generate the secret yourself when you create the connection in Zoom. Zoom does not issue one and Quiq does not generate one. Use a long random string.
The header name must be exactly zoom, lowercase. The value is your secret.
Treat the secret like any other production credential. Anyone holding it can post conversation data to your Zoom webhook endpoint.
Adding the app
Step 1 — Add Quiq from the Zoom App Marketplace
1. Sign in to the Zoom App Marketplace with your Zoom admin account.
2. Search for Quiq and open the Quiq app listing.
3. Click Add app.
4. Complete the add/authorization prompt.
5. The button on the listing changes to Added.
If Add app is greyed out or you see a request-approval message, your Zoom account requires admin approval for Marketplace apps. Submit the request and ask an account Owner or Admin to approve it under Marketplace Management → App requests.
Step 2 — Create a Quiq connection
Connections are created from the Marketplace side, not from Zoom Contact Center admin.
1. In the Zoom App Marketplace, click Manage → Added apps.
2. On the Apps in Production tab, click Quiq.
3. Open the Connections tab and click + Add Connection.
4. The Configure your Quiq connector page opens, showing an Authorize section: Add the API parameters to authorize Quiq to send information to Zoom.
5. In the field labelled Quiq, enter a secret of your choosing — a long random string. Save it somewhere secure; you enter the same value in Quiq in Step 5.
6. Click Submit.
7. The new connection appears in the Connections list. To give it a recognizable name, click the … menu next to it, choose Edit Connection Name, enter a name (for example, the Quiq Contact Point calls will be sent to), and click Save Changes.
Each connection maps to one Quiq Contact Point. Create additional connections if you route calls to more than one Quiq Contact Point.
Step 3 — Assign the connector to a division
The connection now appears in Zoom Contact Center as a connector, but it is unassigned.
1. Sign in to the Zoom web portal and go to Admin → Contact Center Management → Integrations.
2. Open the Connectors tab. Your connection appears with Application name Quiq and Division shown as --.
3. Click the … menu on that row and choose Assign to division.
4. Select the division that should own the connector, then click Assign.
Divisions are managed under Admin → User Management → Divisions.
Step 4 — Configure the connector and select a region
1. On the Connectors tab, click the connector name to open Connector settings.
2. Confirm the settings:
- Connector name — the name you gave the connection.
- Connector type — Voicebot. This is set by the app and is read-only.
- Phone number — leave Zoom generated selected.
- Static URL — populated automatically by Zoom.
3. Copy the Static URL. It looks like https://integrations.zoom.us/eventbus/incoming-webhook/<identifier>. You need it in Step 5.
4. Open the Region dropdown and select your Quiq region. See Selecting the correct region.
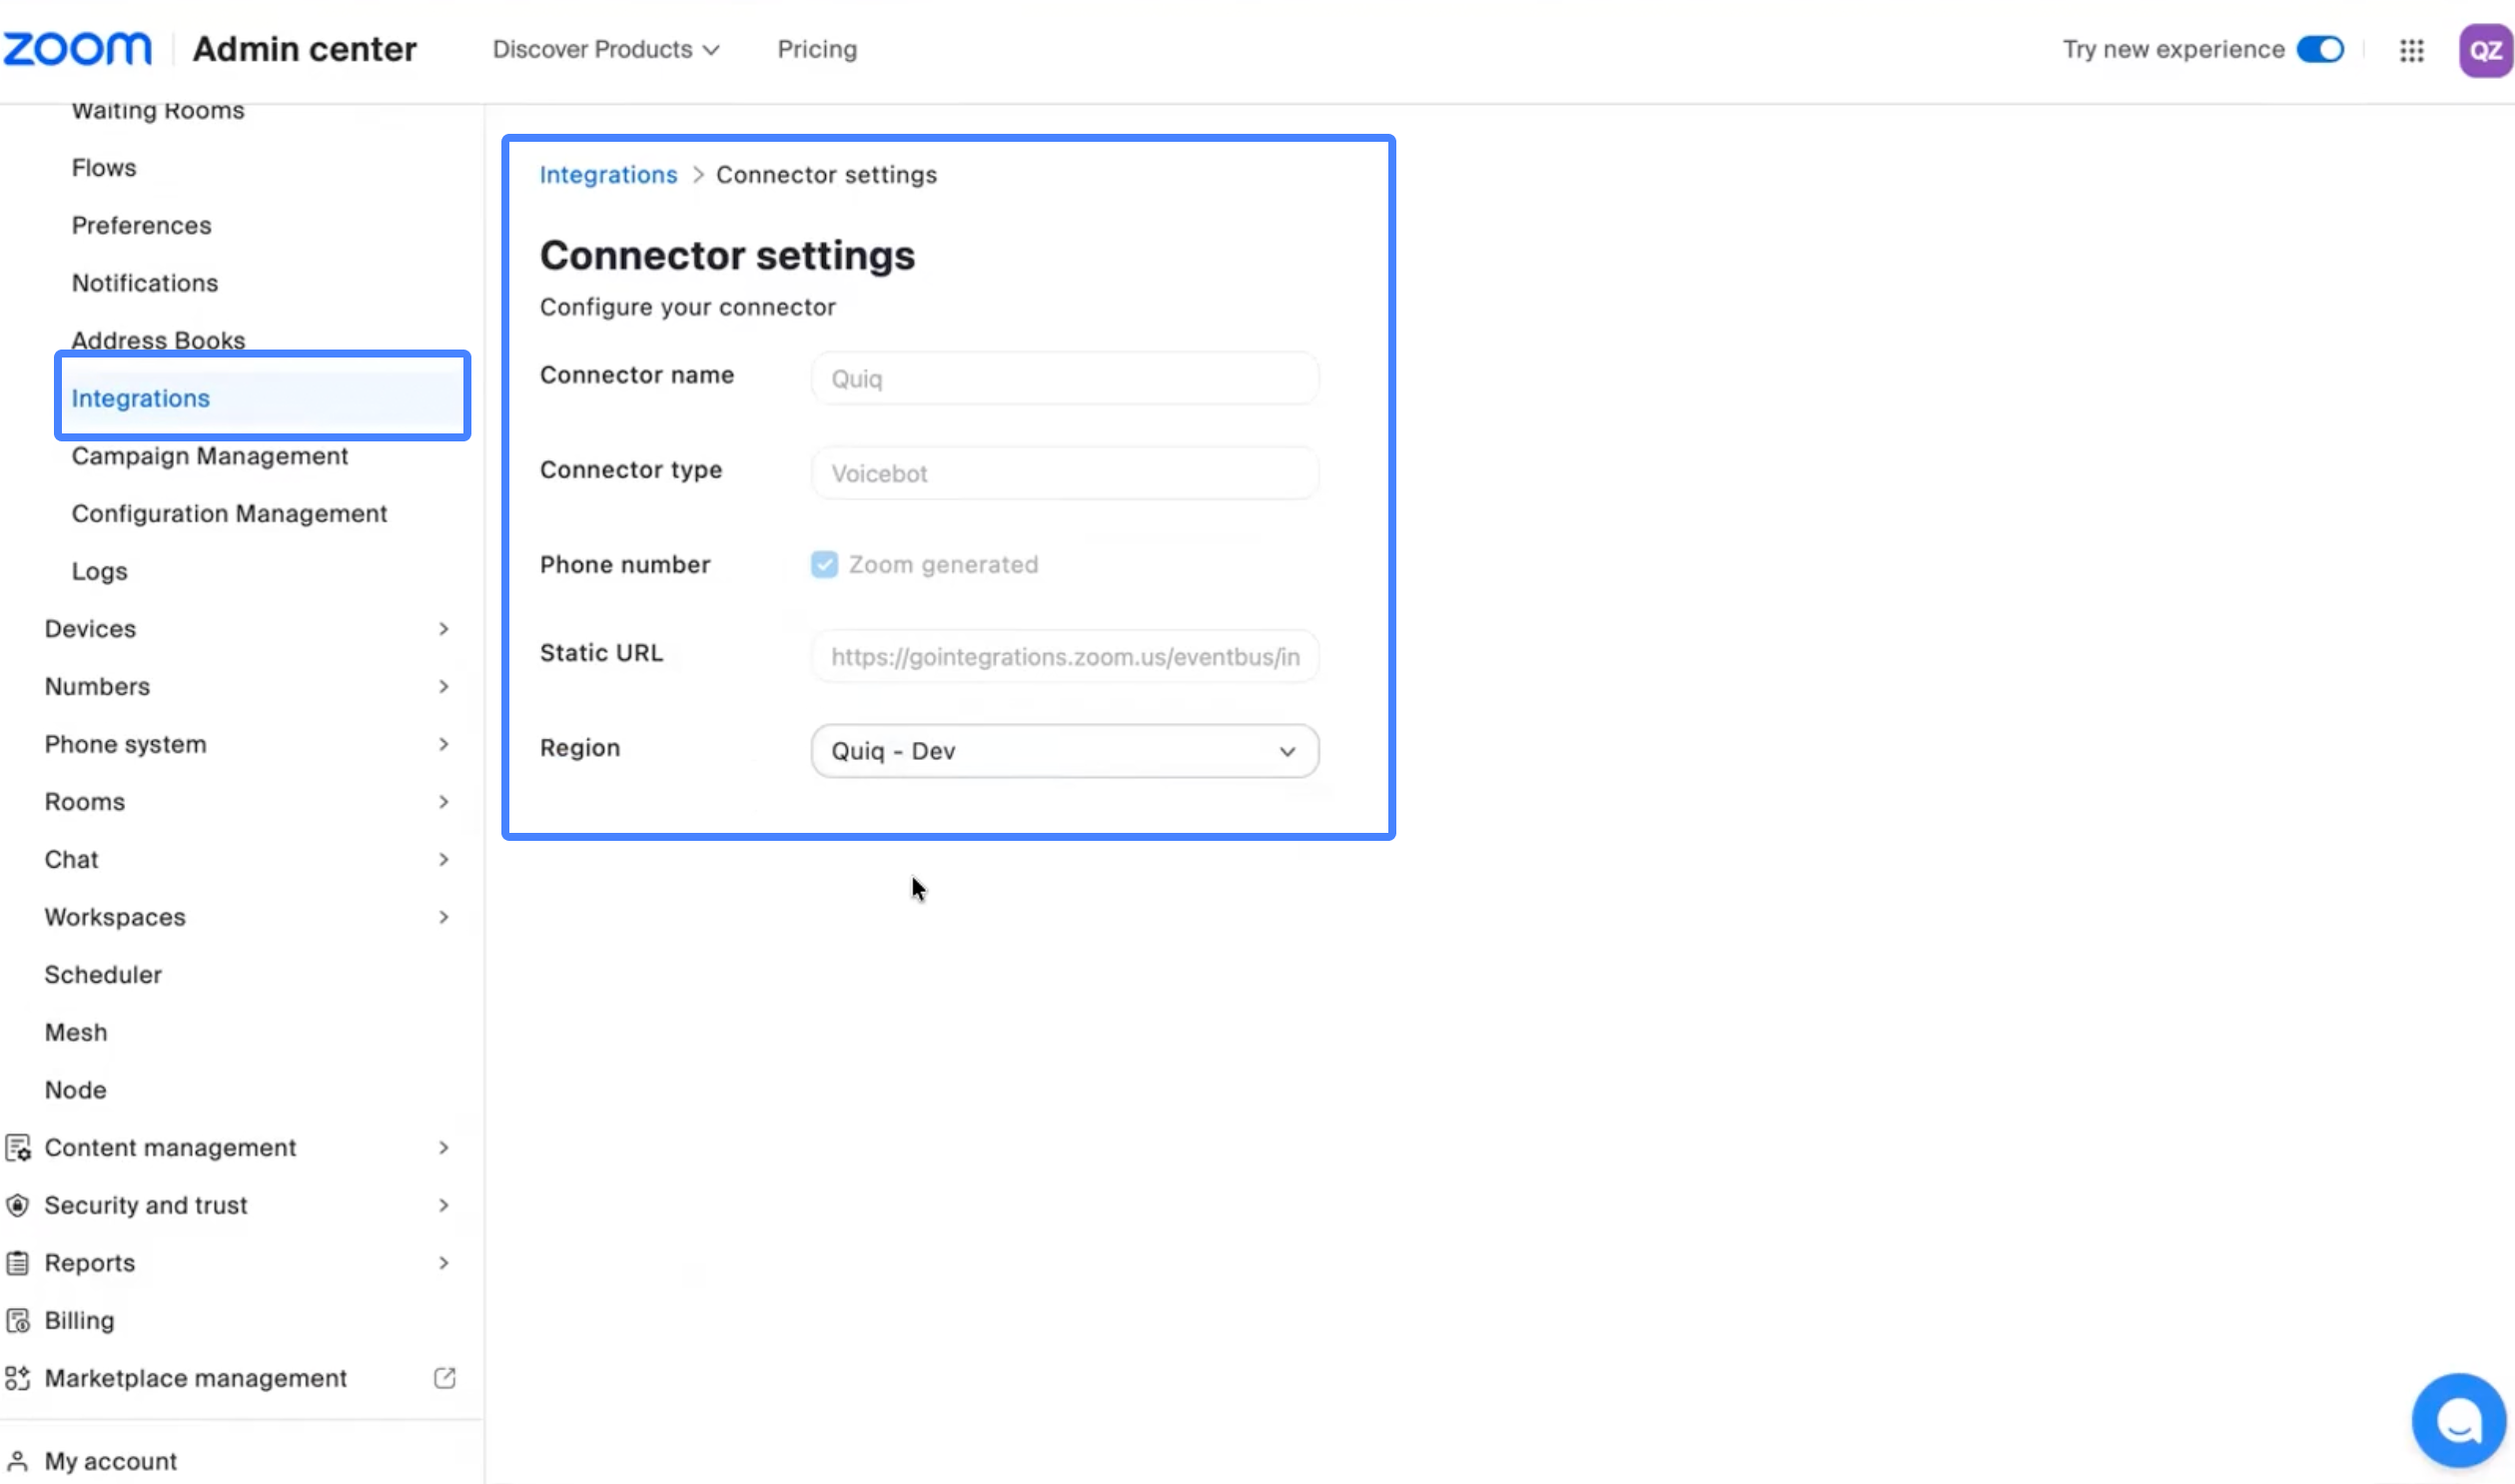
5. Click Save. A Configuration successfully updated confirmation appears.
Step 5 — Connect Quiq back to Zoom
Do this in Quiq, in a separate tab. This step is required for every connection — create the API resource manually using the Static URL from Step 4. Until it is done, calls will reach the connector but Quiq cannot post conversation context back to Zoom.
Create the managed credential
1. Sign in to your Quiq tenant and go to AI Studio → Resources → Managed Credentials.
2. Under Managed Credentials, click + New Managed Credential.
3. Fill in:
- Label — a name you will recognise, for example
zoom-cc. - ID — for example
zoom-cc. - Description — optional.
- Credential Type — select Custom Headers.
4. Click + Add Header. Enter the Header name zoom and the Value — the secret you chose in Step 2.
5. Click Add, then Save.
Create the API resource
1. In your Quiq tenant go to AI Studio → Resources → API Resources
2. Click + New API Resource.
3. Fill in:
- Type — leave as Normal.
- Label and ID — for example
zoom-cc. - Description — optional.
- URL — paste the Static URL you copied in Step 4.
- Authentication Credential — select the managed credential you just created.
4. Click Save.
Selecting the correct region
The Region value must match the Quiq environment your tenant is hosted in. Selecting the wrong region means calls will reach Zoom's connector but never reach your Quiq AI agent.
How to identify your region
Option 1 — ask Quiq. Email [email protected] with your Quiq tenant name and ask which region it is hosted in.
Option 2 — check DNS yourself. If you're comfortable with DNS tooling, resolve your Quiq tenant hostname and read the cluster name out of the CNAME record. The record points at inbound-<cluster>.goquiq.com, and the cluster maps directly to a Region option.
$ dig +short CNAME <your-tenant>.goquiq.com

inbound-aor1.goquiq.com.
Here the CNAME resolves to inbound-aor1, so the correct Region is Quiq - AOR1. A record pointing at inbound-ava3 means Quiq - AVA3, and so on.
If the lookup returns an A record rather than a CNAME, or the hostname doesn't match the inbound-<cluster> pattern, fall back to Option 1 rather than guessing.
Usage
Route inbound calls to a Quiq AI agent
Prerequisites: connection created, region saved, at least one Quiq AI agent configured on your Quiq tenant.
1. Go to Admin → Contact Center Management → Flows.
2. Click + Add flow. Set Channel/Source to Voice, enter a Name, and click Add.
3. In the flow editor, the Start widget is placed for you.
4. From the Widgets menu, under Advanced, drag a Bot widget onto the canvas and connect the Start widget to it.
5. Select the Bot widget. In the Settings panel, open the Bot dropdown. Your Quiq connector appears under 3rd-party voicebots. Select it.
6. Confirm the panel shows Application name Quiq and a Phone number value. These are read-only and confirm the connector resolved correctly. ⚠️ This phone number must be shared with [email protected] so we can connect your app.
7. (Optional) Enable Variables mapping to pass SIP header or API values into Quiq as flow variables. Define the variables first under Flow variables.
8. Wire the Bot widget's three exits:
- Transfer to — the Quiq AI agent asked to hand the call to a human.
- End — the AI agent completed the call.
- Timeout — Quiq did not respond within the maximum wait duration.
9. Drag a Route to widget onto the canvas and connect the Bot exits to it. Configure its destination (queue, agent, or another flow) and wire its Call finished, Overflow, and Routing failed exits.
10. Click Save.
Always give Timeout and Routing failed a real destination — typically a human queue. Otherwise, any service interruption or misconfiguration will drop calls silently.
Register your bot phone number with Quiq
⚠️ Required. The integration will not work until this is done.
When you select your Quiq connector in the Bot widget, Zoom displays a read-only Phone number alongside the Application name. This is generated by Zoom for the connector. It is not dialable and it is not the number your customers call.
Quiq maps that value to the tenant that should answer. The mapping is created by Quiq — there is no setting in Zoom or in Quiq that does it.
Email [email protected] with:
- The Phone number shown in the Bot widget settings, exactly as displayed
- Your Quiq tenant name
Wait for Quiq to confirm registration before you test. This should be completed within a week.
Do this for every connector. A second connection, or a connector recreated after being deleted, gets a new generated number and needs its own registration.
Assign a phone number to the flow
Prerequisites: the flow above exists.
1. Go to Admin → Number Management → Phone Numbers.
2. To provision a new number, click Add Number → Get number, choose Country/Region, Type & Capability (Virtual Service, with Incoming Call capability), State/Province and Area Code, then click Search and complete the purchase.
3. On the Phone Numbers list, click the … menu on the number and choose Assign.
4. Under Assign to, select your Quiq flow, then click Save. The Assigned To column now shows the flow name and Flow Voice.
5. Return to the flow, select the Start widget, and confirm the number appears under Entry points.
Publish the flow
1. In the flow editor, click Publish.
2. The version badge changes from Draft to Published.
A flow only takes live calls once it is published. Edits create a new draft version; republish to make them live.
Verify the integration
1. Confirm Quiq has replied to say your bot phone number is registered. If not, stop — the test will fail.
2. From an external phone, call the number assigned to the flow.
3. The Quiq AI agent answers and begins the conversation configured on your Quiq tenant.
Removing the app
Before you remove
Removing the Quiq app is immediate and affects live call handling.
- Every Quiq connector on your account stops working. Any flow using a Bot widget pointed at a Quiq connector will fail that widget and take its Timeout or error exit.
- Calls in progress with a Quiq AI agent may be dropped. Remove the app during a maintenance window.
- Your flows, phone numbers, and queues are not deleted, but the Bot widget's Quiq selection becomes invalid and must be repointed or removed.
- Zoom revokes the app's access tokens and Quiq stops receiving Zoom call data.
Recommended: repoint your flows first
1. Go to Admin → Contact Center Management → Flows.
2. Open each flow that uses a Quiq Bot widget.
3. Either delete the Bot widget and connect Start directly to your Route to widget, or point the Bot widget at a different bot.
4. Publish each edited flow.
Remove the app
1. Sign in to your Zoom account and go to the Zoom App Marketplace.
2. Click Manage → Added apps, or search for the Quiq app.
3. Select the Quiq app.
4. Go to the app Settings
5. Go to the Manage app tab
6. Click Remove, then confirm.
How Quiq handles your data after removal
Removing the app from the Zoom App Marketplace revokes Zoom's connection to Quiq. It does not, on its own, delete data already held in your Quiq tenant — conversation records, transcripts, and analytics from calls the AI agent handled remain under your Quiq contract until you ask for them to be removed.
To request deletion of your Quiq data, email [email protected] from an address associated with your account, stating the tenant name and the scope of the deletion you want.
You should also email [email protected] to deactivate the connector for your tenant.
Data held on the Zoom side — engagement records, agent panel history, and reporting — is governed by your Zoom Contact Center retention settings and is unaffected by removing this app.
Troubleshooting
| Symptom | Likely cause | Fix |
|---|---|---|
| Calls do nothing, or fail immediately, and everything else looks correctly configured | The connector's auto-generated bot phone number has not been registered with Quiq | Copy the Phone number shown in the Bot widget settings and email it, with your tenant name, to [email protected]. Wait for confirmation. This is the most common cause of a fully-configured integration not working. |
| Calls work, but the agent panel shows no summary or transcript after transfer | HTTP target missing, wrong URL, or a credential mismatch | Confirm the target's URL matches the connector's Static URL exactly, and that the zoom header value matches the secret entered in Zoom |
| Quiq's requests to Zoom are rejected as unauthorized | Header value does not match the secret, or the header is not named zoom | Compare both values character for character; confirm the header name is lowercase zoom |
| Summary or transcript arrives only sometimes | Payloads sent after the call ended or after the transfer | Zoom rejects context posted after line tear-down. This is a timing issue on the Quiq AI Agent configuration side. Make sure the AI Agent calls the Zoom webhook before the conversation is closed. |
| Calls immediately transfer back to the Zoom Flow | Wrong Region selected, or no AI agent configured on the Quiq tenant | Verify the region in Connector settings; confirm an active AI agent in Quiq |
| Nothing happens when the number is called | Flow is still in Draft, or the number is not assigned | Publish the flow; confirm Assigned To shows the flow under Phone Numbers |
Contact support
- Email: [email protected]
- Knowledge base: https://knowledge.quiq.com
For questions about your Quiq region, tenant, or AI agent configuration, contact your Quiq account manager.
Updated about 16 hours ago