Basics
Bot Basics
AI StudioThis is documentation for the classic Quiq bot designer. AI Studio documentation can be found at: https://ai-studio-docs.quiq.com/
Creating a Bot
The first step in designing a bot within Quiq’s bot designer is to create a new bot user. Bots are a special type of agent within Quiq. The ability to create and edit Bot Users is available to administrators from within the Admin portion of the Quiq app. Select the Bots tab from the left-hand side and click the ‘Create New Bot’ button at the top. Give the bot a name, email etc. Then click save.
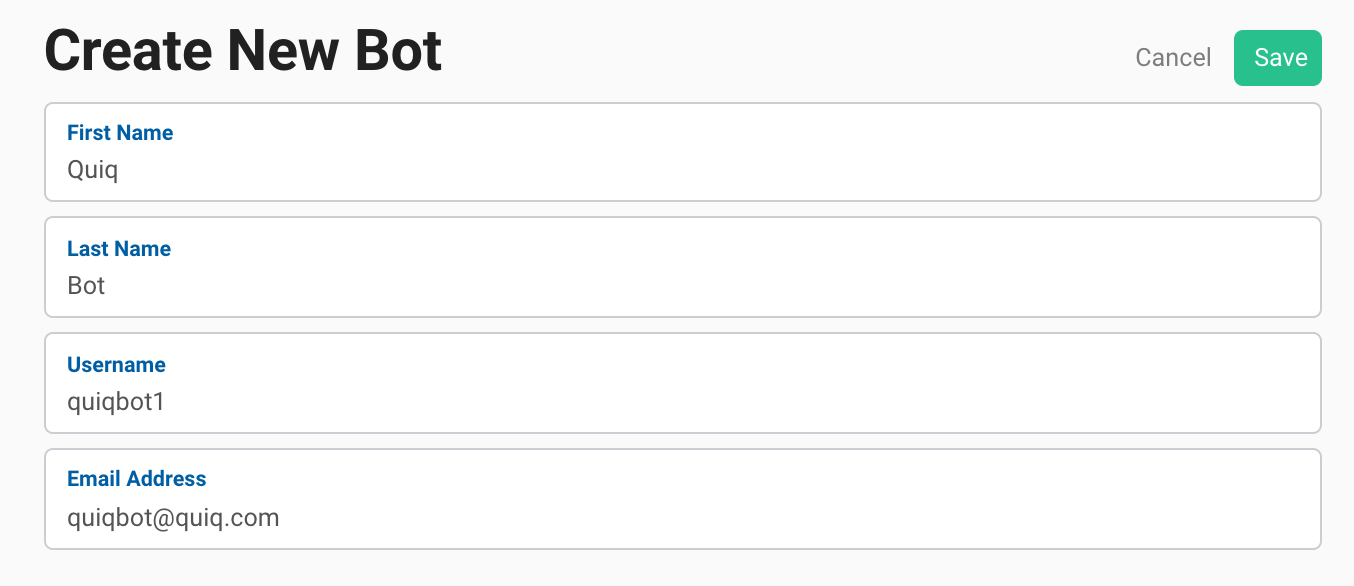
After creating the bot user you must choose which type of bot you’re building. To use the bot designer simply select "Quiq Bot" from the Bot Type dropdown menu.

Upon choosing Quiq Bot and clicking save, you will be granted access to open the Quiq Bot designer.
Versioning
Before diving into how to build a bot in the designer, let’s talk about how they are versioned. Each bot you create has its own revision history.
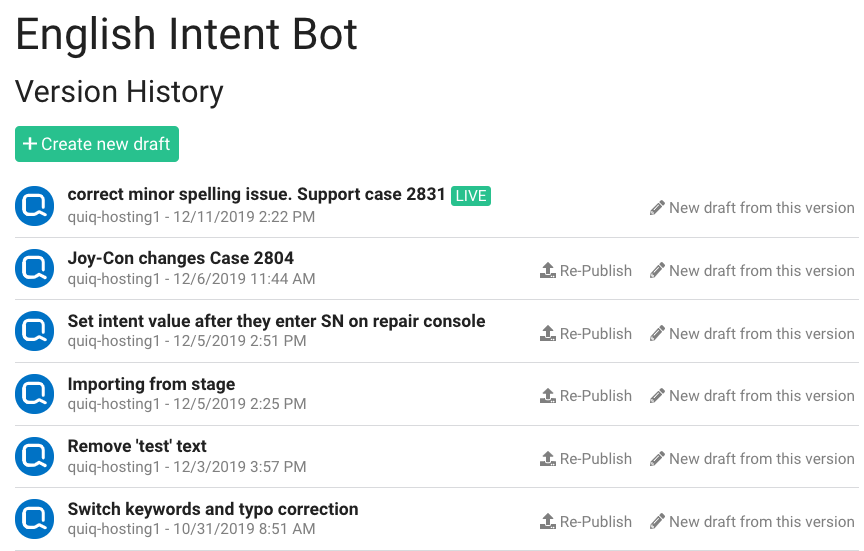
The revision history allows you to track changes over time and easily revert back to previous versions of the bot’s behavior. To create a new revision, you must first create a draft version of the bot and edit its behavior in the designer. Once you’re comfortable with your changes, you may Save and then Publish your draft into a new revision. You will be prompted for a description of your changes.

Publishing a new revision
You can create a draft using any previous revision as the starting point. If you click the big green Create new draft button then the draft will start from the revision that is currently live, in this case “correct minor spelling issue. Support case 2831”.
You may be wondering what happens to ongoing conversations when you either publish a new revision or revert to a previous revision. When a conversation is assigned to your bot, it will be associated with whichever revision is currently live and will stay with that revision of the bot’s behavior until the bot reassigns or closes the convo. Therefore, all conversations that start after you publish a new revision will be associated with that revision, whereas ongoing conversations will remain pinned to the revision they started on. This insures that your bot never has downtime.
One final note on bot versioning: each bot has its own revision history. This is important to bear in mind when deciding whether to put all of your functionality into one bot or to split the functionality across bots that cooperate. The best practice is to introduce additional bots for parts that you would want to update or rollback independently. Another rule of thumb is to introduce separate bots whenever the task at hand represents different job functions within your organization.
Exporting and Importing
You can export any version of a Quiq Bot. The downloaded Bot definition file can then be imported, either to another Bot User, essentially copying the Bot, or into another tenant to migrate changes made in a staging tenant to production.
Export
After opening the Quiq Bot Designer for any Bot User, an Export button is displayed for each version on the Version History page, except for the entry for the original default logic. Both the current Draft and Live versions, as well as previously published versions, can be exported.
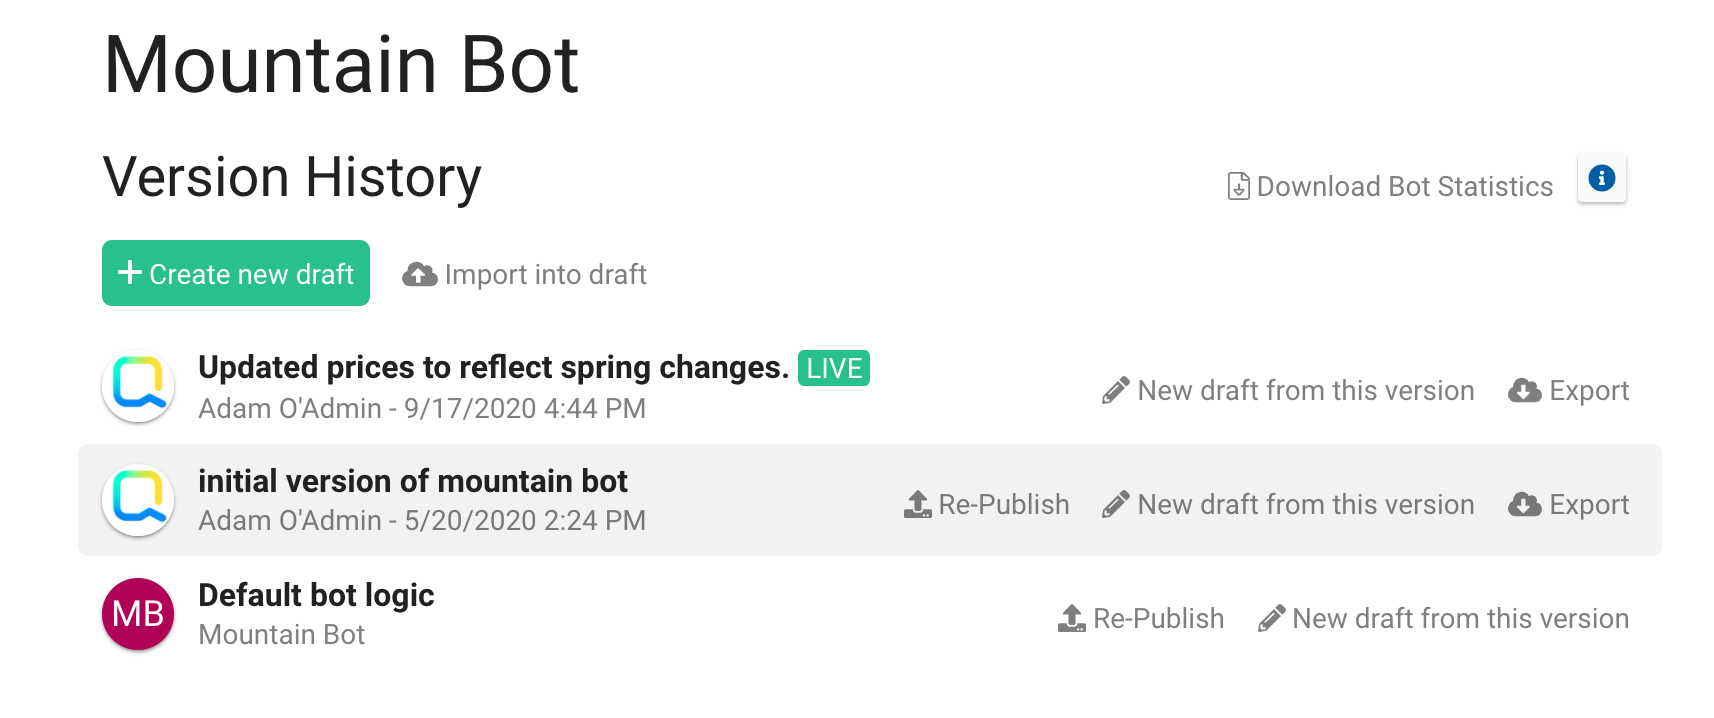
Selecting the Export button will download a .json file locally containing the bot definition. The file name is in the format QUIQBOT_botuser_YYYYMMDDHHMISS.json, where botuser is the Bot’s username and the date/time is the time the file was downloaded.
Do not edit this file. If this file is edited in any way, you will not be able to import it.
Import
A previously exported Quiq Bot definition can then be imported into a Quiq Bot to the Draft version. If a Draft version already exists, an Import button is available which will overwrite the existing draft with the definition in the export file. If no Draft version currently exists, then a Import Into Draft button exists which will create a new draft version with the definition from the export file.
After selecting the Import button, you will be prompted for the bot definition file to import. You can drag a file into the box, or click and select one from the file manager.
If you select a file that is not a Quiq Bot export .json file, or the file has been edited in some way, a message will tell you that the file is not a valid Quiq Bot definition and you must select a different file.
If importing into a different tenant than that the Bot was exported from, if the custom fields referenced in the export bot definition are not exactly the same between the tenants, you may also get a message stating that the references to the custom fields need to be removed, and the Bot exported again before it can be imported.
Dependencies
After selecting a valid bot export .json file, depending on the behaviors that are configured in the exported bot definition, you may need to reset some dependencies. Dependencies are references to objects (things like Contact Points, Queues, Agents, etc). Some dependencies may exist in the exporting tenant, but not the importing tenant.
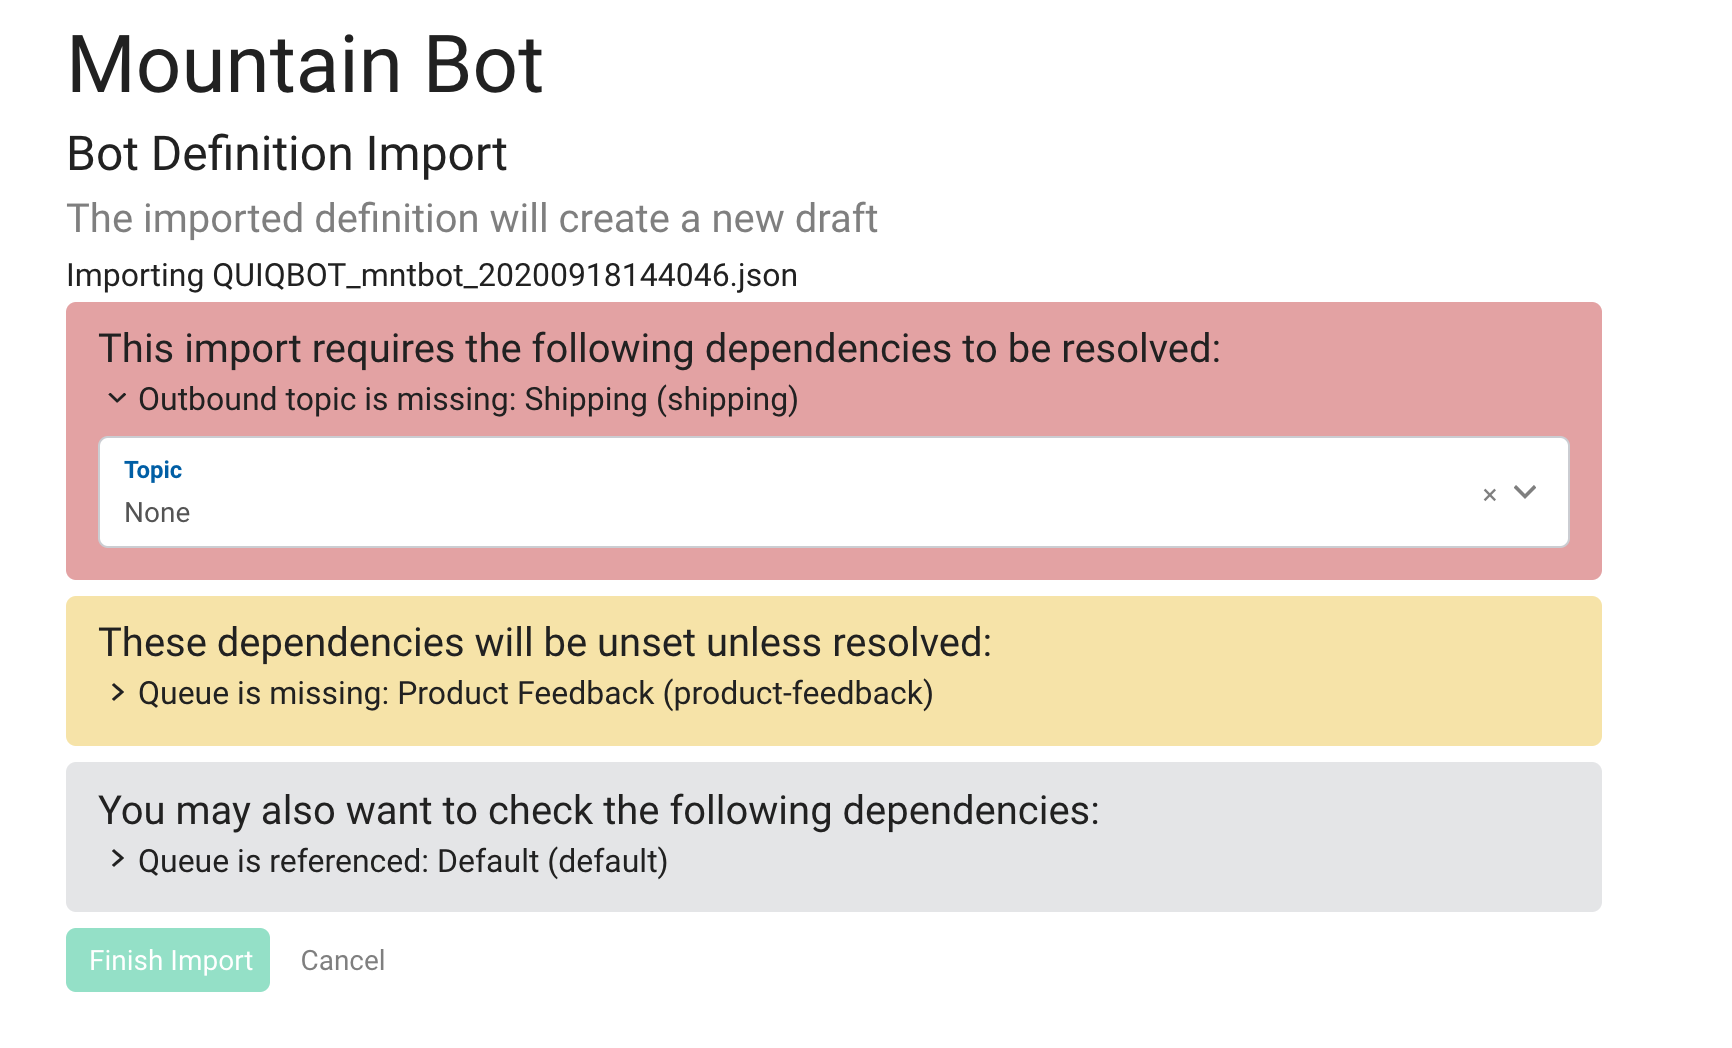
There are 3 types of dependencies: Required (red), Warning (yellow) and Optional (gray).
-
Required dependencies must be set to continue. You will be required to map a dependency when you have a Decision Condition that references an object that doesn’t exist on the importing tenant.
-
Warning dependencies may be reset, but you are able to continue without setting them. If you do not set warning dependencies, after import you will have validation errors on the Bot that need to be manually corrected.
-
Optional dependencies are indicating that the object referenced in some behavior does exist on the importing tenant, but you can change the reference to something else if desired.
After selecting the Finish Import button, you are taken to the Quiq Bot Designer and the draft version of the Bot contains the definition from the export file.
Things to note:
-
Exported assets are only available for 5 days after export. When Bot export file containing assets is imported into a different tenant (that does not contain those assets) after the 5-day expiration window, the import will succeed but the assets will be missing. A pop-up notification in the Bot Designer will alert the Admin if this occurs.
-
If the exported Bot definition file has behaviors that contain Decision Conditions on a custom field, and that custom field is missing or incompatible on the importing tenant, the Bot cannot be imported.
-
If the exported Bot definition file has behaviors that contain Set Field or Increment Field Actions on a custom field, and that custom field is missing or incompatible on the importing tenant, the Bot can be imported. However there will be validation errors that will need to be manually corrected.
Designer Basics
Now let’s dive into the designer itself. Your bot will be built by adding various Behaviors and hooking them up in meaningful ways. The behaviors and the paths between them are what define your bot. The designer makes it easy to understand your bot by showing a picture of how everything relates in the ‘Flow Pane’:
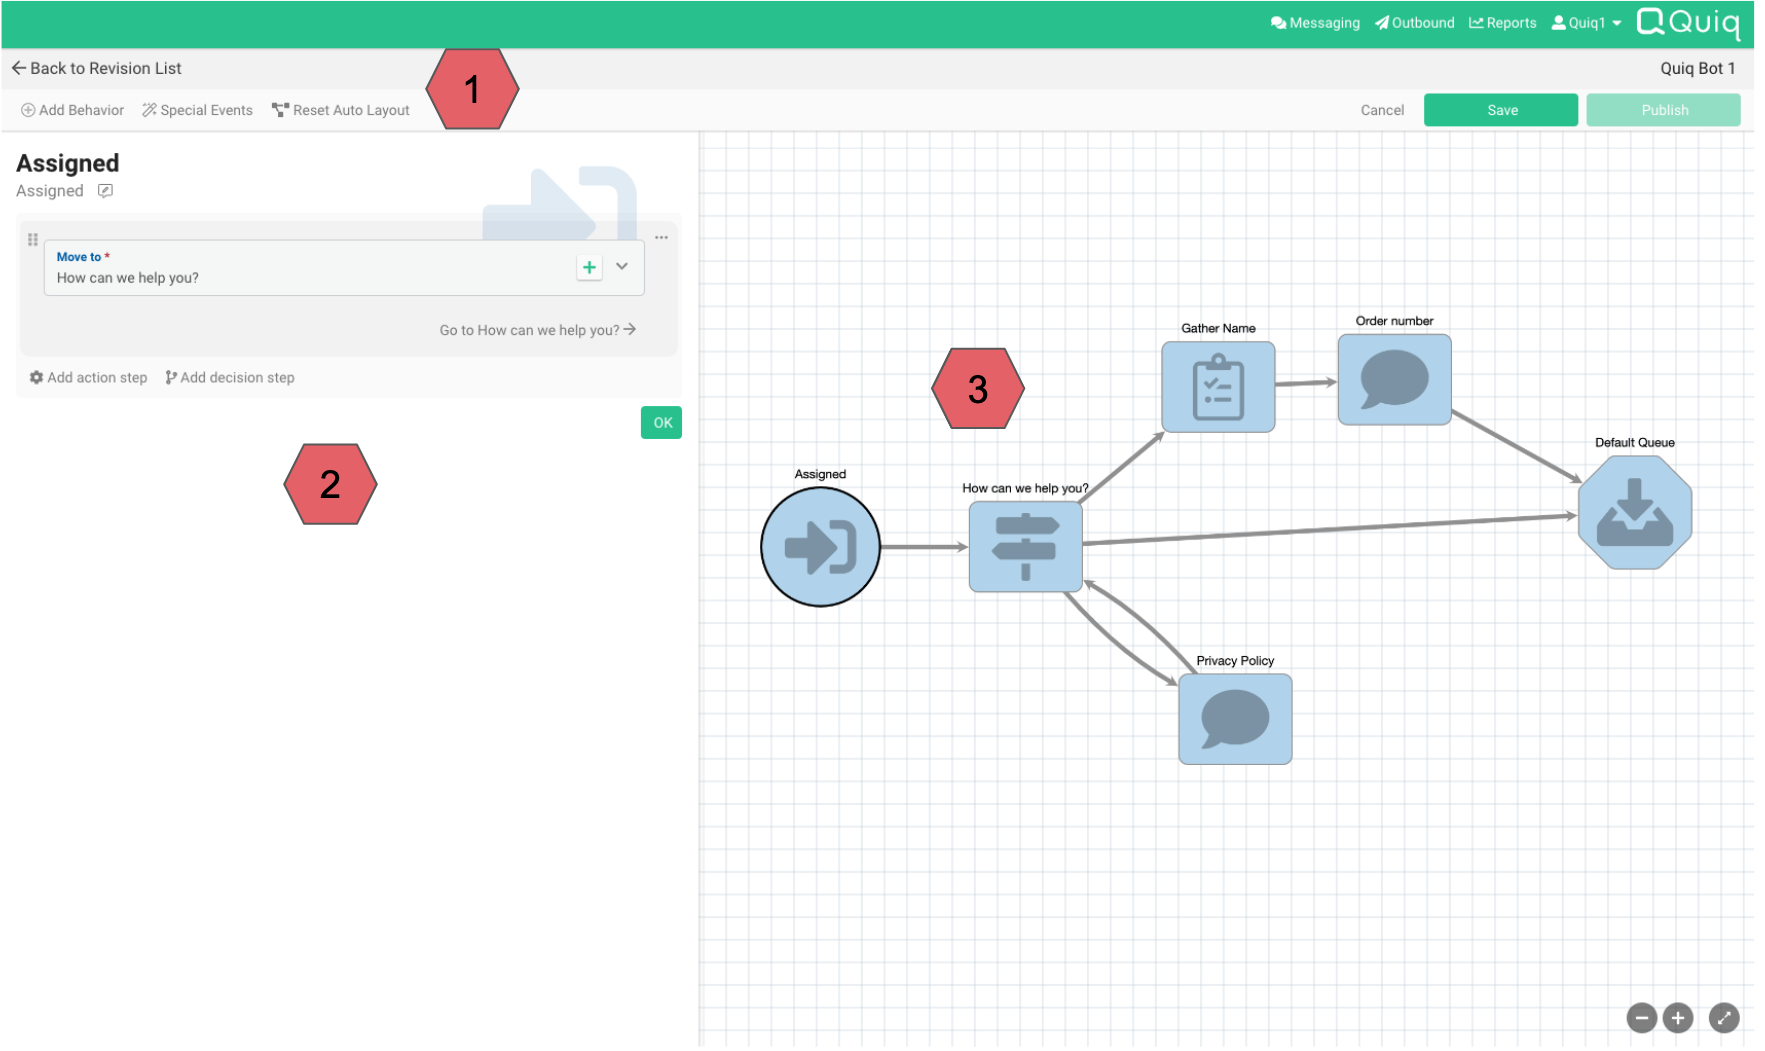
The primary areas of the Bot Designer
1. Bot Toolbar: Use the toolbar to add new behaviors, configure special events, reset the flow layout and Save/Publish your changes
2. Configuration Pane: Used to configure individual behaviors or special events. This area is collapsed until you begin configuring something
3. Flow Pane: The focal point of the bot designer - a picture of how your bot works from which you can select pieces to work on
The flow pane is the focal point of the bot designer. It shows how the bot behaviors relate to one another as well as the overall conversation flow. The designer attempts to layout your bot in a visually pleasing way, but you may wish to manually rearrange the behaviors. You can drag-and-drop all elements that appear in the flow pane. Should you wish to return to the automatic layout, click the Reset Auto Layout button in the toolbar. If you wish to move multiple items at once, simply press and hold the command/control button and use the mouse to select multiple items.
To configure a given behavior or special event that appears in the flow pane, simply double-click it and the configuration pane for that item will appear on the left. A behavior can be created by copying an existing behavior. Select the behavior you wish to copy in the flow pane, and use the Copy/Paste options from the right-click context menu, or the Cntr/Cmd-C and Cntr/Cmd-V options to copy and then paste the new behavior onto the Flow Pane.
Note the zoom controls in the bottom right of the flow pane. The ability to zoom in and out will become important as your bot grows more complex. You can also pan the flow pane by clicking in any open space and dragging your mouse.
Synchronizing Data to External Sources
The data that is gathered, set or maintained by your bots is available to be synchronized into your CRM system or exposed via Quiq’s webhooks and other BI integrations because it is attached to the conversation and customer records.
Synchronizing data into CRM fields doesn’t happen immediately. It can be configured to occur when the conversation starts, changes queue or closes. This behavior is not configured within your bot because it applies to data gathered by live agents as well. For more information contact Quiq Support.
Bot Designer vs. Conversation Rules
Quiq provides two important features that allow for workflow and conversational automation: the bot designer and conversation rules. Some tasks you wish to perform can be accomplished using both the bot designer and conversation rules. In this section we’ll characterize the intended use of each feature and provide some best practices.
Bot designer
The bot designer is intended to automate all or a portion of the messages on a conversation. Put another way, the bot is intended to automate messages within a conversation. The bot is the owner of the conversation in the same way a live agent would be.
Conversation rules
Conversation rules are primarily concerned with automating conversations that don’t have an owner. The automation performed by conversation rules can be generally thought of as automations that happen on a conversation rather than within them.
Based on these bread-and-butter use cases, the following is a list of things we recommend that you not do:
- Don’t try to automate all or a portion of the messages on a conversation with conversation rules. Use a bot for this. Messages sent from within conversation rules are “system messages” - messages that are sent anonymously by the system, perhaps to tell the customer that they are stuck waiting in the queue. The messages you send from conversation rules generally shouldn’t be assessing or addressing the conversational need, just informing the user of things “outside” of the conversation.
- Don’t try to design a bot that acts as the “wait queue” for your conversations. Use conversation rules to deal with waiting/unassigned conversations. The bot designer doesn’t have what you need to do a good job of this. Only conversation rules provide an ability to periodically check in on a unassigned/waiting conversation and apply workflow.
- A noted gray area between conversation rules and bots has to do with automatically setting or changing the queue, either when the conversation starts or after some important data has been collected. In many cases you can use either feature set to make routing decisions on a convo. In fact, you can design bots that don’t send any messages but only make routing decisions. But remember, in order to have a bot perform routing automation you must first route the conversation to the bot - a task controlled by conversation rules.
Updated 3 months ago
