
Salesforce Lightning Console Integration
Overview
When your customers start a new conversation, the Quiq system can create a new Salesforce Case, Lead or Task for the conversation, depending on your company's business needs. You may create a System Administrator account for a Quiq employee to complete this setup, or you can proceed with these steps on your own.
The instructions below are specific to the Lightning Experience interface. It is assumed that your Salesforce site will have Lightning Experience enabled and that your team(s) will be using a console navigation application within the Lightning Experience.
Quiq is happy to make a test site available to match with a Salesforce Sandbox site. Whether your Salesforce admin or Quiq accomplishes the configuration, your admin should be available and work with Quiq through the process.
Set Up Steps
NOTEYOUR_QUIQ_TENANT is a placeholder for the name of your tenant in the Quiq system. It is often your organization name and is the first part of the URL to your Quiq site. Confirm this with Quiq support before you continue. YOUR_SALESFORCE_SITE is the full name of your Salesforce site, typically ending in salesforce.com.
Quiq connects to Salesforce via a Connected App.
1: Integration Account (Execution User)
Salesforce requires External Client Apps to be associated with a specific "Execution User." The Quiq backend acts as this user, which serves as the identity for all Case/Lead creations. To prevent disruption, this user should have a non-expiring password. This user will need to have the permission "Download AppExchange Packages" to enable them to download the Quiq package in step 3..
1. In Salesforce, navigate to Setup > Users > Profiles
2. Create a new profile by cloning from the "System Administrator" profile*
3. Name this profile “Quiq Integration” and save
4. In the new profile navigate to System Permissions
5. Click Edit and update the "Password Never Expires" to true and save
6. Navigate to Users > Users > New User
7. Create a new user with the “Quiq Integration” profile. For email/username use “[email protected]”.
NOTEIf you prefer not to create a new profile or clone the system administrator profile you may set up the Integration user with an existing profile (Salesforce license) and instead create a new permission set specific for Quiq.
Quiq will need access to Accounts, Contacts, and Leads for phone number and email matching as well as to any objects and records (e.g., Cases and Tasks) that you desire to have Quiq create and update.
Depending on your Salesforce security and permission settings using this method may require you to update record sharing rules as well. Work with your Implementation Specialist to ensure all the proper access has been granted.
2: External Client App (ECA)
1. In Salesforce, navigate to Setup > External Client App Manager > New External Client App.
2. External Client App Name: "Quiq Backend Integration".
3. Contact Email: [email protected].
4. OAuth Settings Section:
- Check Enable OAuth.
Check Enable Client Credentials Flow.
Callback URL: Input https://YOUR_QUIQ_TENANT.goquiq.com/idp/callback/salesforce (This field is required by the UI, though not used in this specific flow).
Selected OAuth Scopes: Choose Manage user data via APIs (api).
5. Click “Create” to save the app.
6. Ensure the App Status is “Enabled.” If not, click the dropdown arrow next to the app and to enable it.
7. View Consumer Details:
- Select the Settings tab and expand the OAuth Settings section
Click the button that says Consumer Key and Secret
Verify your Salesforce identity if required
Copy the Consumer Key and Consumer Secret and securely send them to your Quiq implementation specialist
8. Configure Policies:
- Select the Policies tab and click Edit
- Permitted Users: Select "Admin approved users are pre-authorized".
- IP Relaxation: Set to "Relax IP restrictions" (or work with Quiq to correctly enable IP restrictions)
- OAuth Flows and External Client App Enhancements: check Enable Client Credentials Flow and set the Run-As (Username) to the Quiq Integration user created in Step 1.
9. Save
3: Install the Quiq Package
Log into Salesforce as a user with adequate (admin) permissions, then open a new browser tab and place the Quiq Package URL provided by your Quiq implementation specialist. This will open a package installer interface and allow selection of target users. Ensure that “Install for all users” is selected. This will grant access to the lightning components and classes that are needed to run Quiq inside of Salesforce.

When the installation has completed, select Done.
4: Add Quiq Components to Consoles
Quiq components are designed to fit into Lightning apps in both the Utility bar and Lightning Record Page layouts.

Utility Bar
1. In Salesforce, navigate to Setup > Apps > App Manager
2. Find the Lightning console navigation App to which you wish to add the Quiq components (or create a new application), and choose Edit from the dropdown menu in the last column
3. In the Lightning App Builder screen, select Utility Items on the left side menu
4. Click the "Add Utility Item" button
5. Scroll down to the Custom - Managed sections and choose Quiq Messaging
6. Confirm the Utility Item Properties as follows:
-
Label = Quiq Messaging
-
Icon = No Icon
-
Panel Width = 340
-
Panel Height = 480
-
Start automatically = true
-
Base Quiq Url = https://YOUR_QUIQ_TENANT.goquiq.com
-
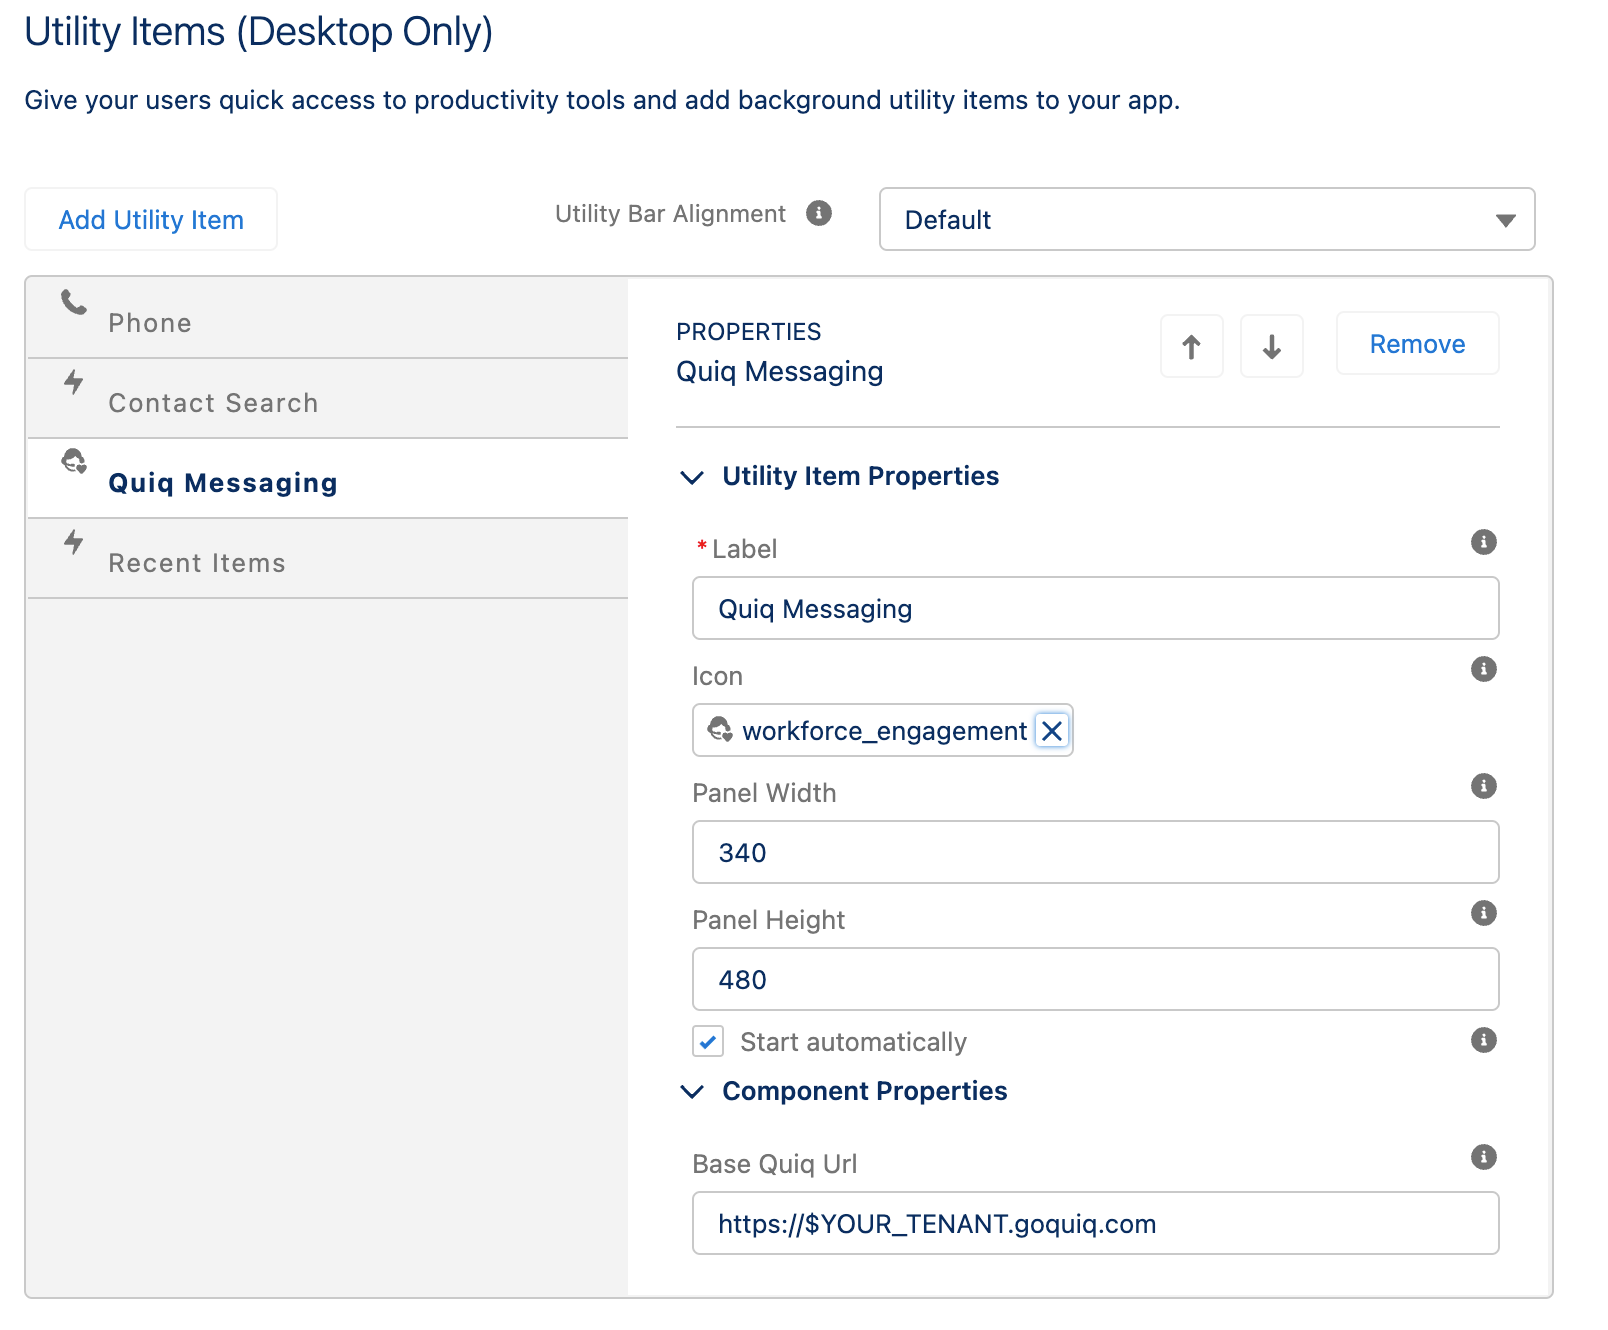
7. Save
Trusted URLs
NOTEThese Trusted URL steps may only be required in orgs created on/after the Summer 2024 release, however it is likely a good idea to follow these steps as Salesforce may make these steps required in a future release after Winter 24.
1. In Setup search for Trusted URLs
2. Click "New Trusted URL"
3. For Trusted URL Information input "Quiq" for API Name and for URL input *.goquiq.com. Check all boxes for CSP Directives and chose "All" for CSP Context. Save this Trusted URL.
4. Add a second trusted URL named "Salesforce" and set the URL input to *.salesforce.com. Check all boxes for CSP Directives and choose "All" for CSP Context. Save this Trusted URL.
Pages
Once the page has been activated, open the app and select a record to view the result. The Quiq Conversation component may reside in any page layout, but should be given adequate room for the conversation and collaboration sections to display correctly.
1. Navigate to your object (e.g., Cases) and create or modify an existing lightning Record Page
2. In the lighting page editor, find the "Quiq Conversation" custom managed component from the left hand
3. Label - Quiq Case or Quiq Lead (depending upon record type)
4. Object - Case or Lead
5. Click Next, and select a desired layout (suggest “Header and Right Sidebar”)
6. Click Finish
7. Under Components, locate the Custom - Managed components section and drag the "Quiq Conversation" component to your desired location on the record page layout.
8. Under the component configuration add the following:On the right side enter the following:
- Height = 800
9. Save and Activate the Page

Custom Settings
1. In Setup search for Custom Settings
2. Click Manage in the Quiq Settings custom setting
3. Click New to create the Default Organization Level Values
4. For Quiq URL, enter the URL of the your base Quiq site. E.g. https://tenant.goquiq.com. Ensure you don't have a trailing slash.
5. Click Save
Updated 4 months ago