Snippets
Overview
Snippets represent prepared, re-usable content that an agent may insert into a conversation by using a few keystrokes. This content may be simple or rich, and may also be universal or platform specific.
Users may maintain their own personal Snippet library from Messaging > Settings > Snippets, and your company's Quiq Administrator may make Snippet content available to all users by creating Global messages in the Message Catalog, and setting the message's visibility to include the "Agent Conversations", "Outbound Notifications", and "Start Conversation" agent-facing scenarios. An Admin may review an individual user’s Snippets in the Agent view in the Message Catalog, and also via Admin > Users, where personal Snippets will be listed.
All Snippets in your Quiq site, both those available for everyone & those owned by individual agents, automatically have corresponding messages in Admin > Message Catalog. This allows Admins the ability to easily view, create and modify all Snippets in your Quiq site from the Message Catalog. The Snippets set to be available for everyone will be listed in the Global view, and those owned by individual agents will be listed in the Agent view. Snippets set to be available for everyone can be viewed from the Snippets editor, but they can only be created and modified by Admins from the Message Catalog editor.
Creating a New Snippet
There are several locations where you can initiate the creation of a new Snippet:
- From Messaging > Settings > Snippets (for individually-owned agent Snippets)
- From the agent view's active conversation message composer (for individually-owned agent Snippets)
- From a previous message in the conversation thread (for individually-owned agent Snippets)
- From Admin > Message Catalog (for Snippets that can be used throughout the product, including global ones available for everyone)
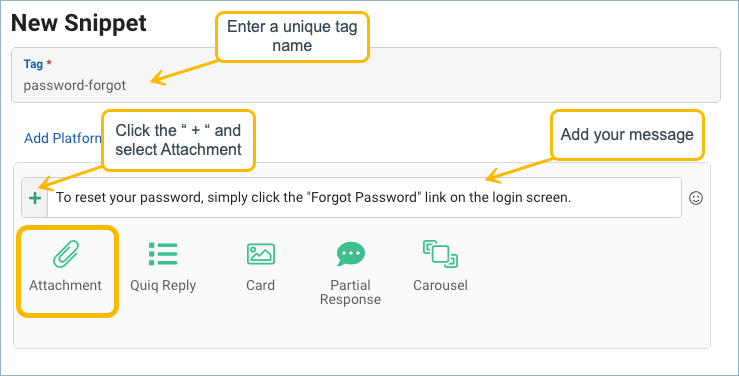
Regardless of how you initiate the creation of a new Snippet, a basic Snippet requires a few areas to be completed:
Tag/Trigger
The Tag/Trigger is the unique name of the Snippet to be used as the keyboard shortcut for agents while entering a message in the conversation message composer. This Tag/Trigger must be unique.
It is recommended that you organize your Tags/Triggers using prefixes by business function that make it easy to search. For example:
- refund-approved
- refund-denied
- refund-pending
- shipping-canceled
- shipping-status
- shipping-tracking
Text
This is the text of the message. Emojis and file attachments are supported.
Availability
Snippets created and edited in Messaging > Settings > Snippets are only available for the individual user who owns the Snippet. The visibility of Snippets that need to be available for everyone, or will be used in other parts of the product, can be defined by your Quiq Administrator via the Availability options for a message in the Admin > Message Catalog editor.
Customization of Snippets
Snippets don't have to be plain text and can be further enhanced for rich messaging. See the options below.
Attachments
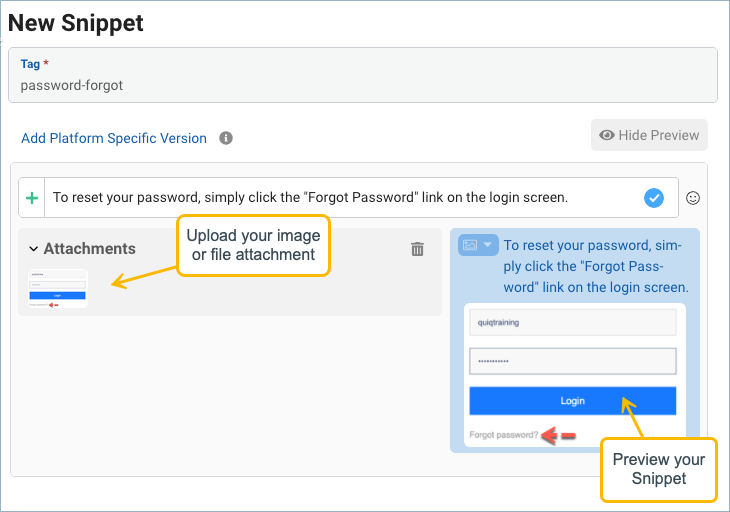
Adding attachments to your Snippets is easy. Simply click the " + " button, upload your image or attachment, preview and save. Please refer to Supported MIME Types for File Attachments.
Quiq Reply
Add a list of selectable responses that may be presented to and easily selected by the customer. In most cases this is presented as a question or instruction to make a selection. The question or instruction is entered in the text field, then replies may be added below by clicking the + Add Reply button.
Quiq Replies also offer the following advanced options:
- Custom prefix - allows you to specify the single character prefix that displays for each reply item in a Quiq Reply for SMS end users (all other platforms display buttons for each reply). For example, you could set the prefixes for a Quiq Reply to be 1), 2), 3) instead of a), b), c).
- Add Aliases - allows you to define other words for a reply item that when sent as a response by end users will also match that reply. For example, you could define the aliases 'Yes' & 'Yep' for a reply item with the label 'Yes', so if an SMS end user actually types and sends either of those words instead of sending the 'Yes' reply's prefix, that reply item would still be matched.
- Change status - allows you to define what should happen to the conversation status when that reply item is selected. For example, if you have a reply item of "I'm finished" you could automatically set the conversation status to closed when your customer chooses that option, saving agents time.
- Route to queue - allows you to define what should happen to the conversation owner when that reply item is selected. For example, if you have a reply item of "Help with order" you could automatically Route to your Customer Service queue when your customer chooses that option.
- Change field value - allows you to set or change a field value. Standard, editable customer fields as well as custom conversation or customer fields may be set.
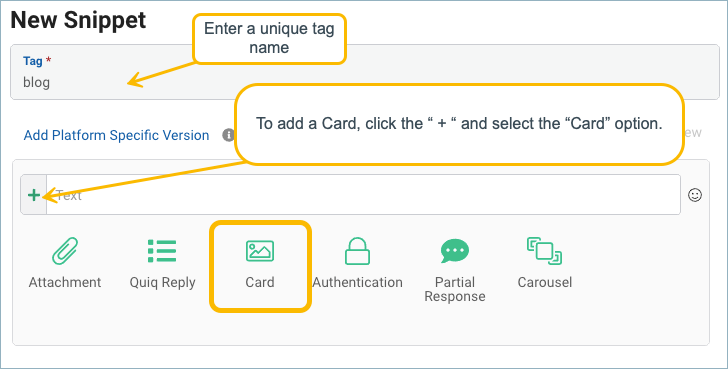
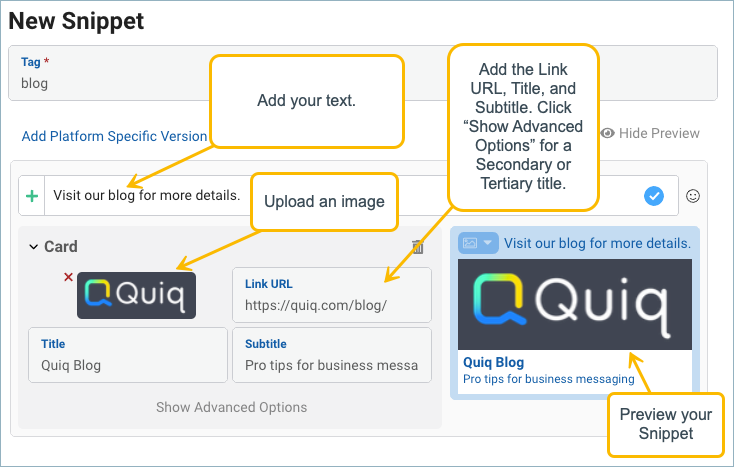
Card
A Card is often used as a coupon or a lead to specific content on a web page. The Card elements are the message text, the display image, the URL the user is directed to when clicking the card, title, and subtitle. Advanced options include secondary and tertiary title and image URL (vs. uploading the image). Cards are displayed directly in all but the SMS platform as it has no graphical capability - in SMS conversations, a link to the Card is sent to the user, that may then be clicked to view the Card content.
Partial Response
The Partial Response Snippet type is used to send a message to a customer where they are not expected to reply. The Adaptive Response Timer will be in effect when the message is sent and the conversation will remain active until the agent sends another message. Partial response Snippets are a great way to let your customer's know that you need a little extra time to research or troubleshoot their issue.
Authentication
You can use an Authentication type Snippet to verify your customer's identity as needed. In order to use this feature, your Quiq site must be enabled. See End User OAuth for more information.
Enabling AuthenticationIn order to add an Authentication type snippet your Quiq site must be setup. Contact Quiq to enable this.
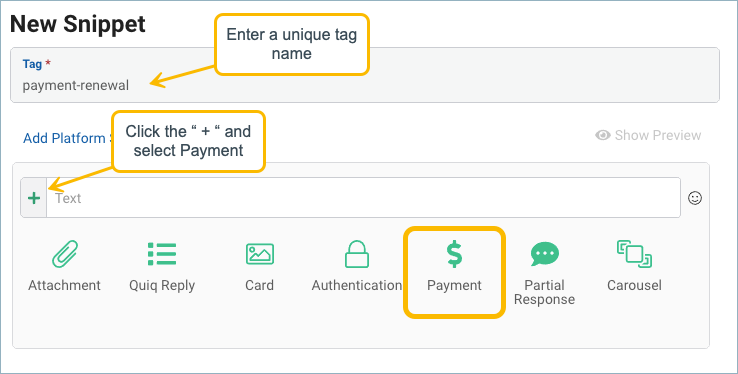
Payment
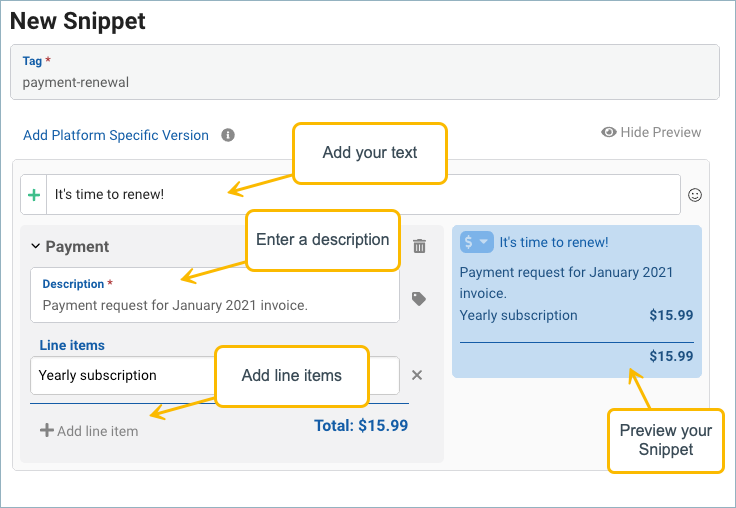
Use Payment Snippets to easily request payment for your product or services. The payment request will be sent via messaging to your customer sending them to your payment provider.
Enabling PaymentsIn order to add a Payment type Snippet your Quiq site must be setup with Quiq Pay Integration. Contact Quiq to enable this.
Carousel
A Carousel Snippet allows an agent to send a series of images with links to your customer that are presented in a carousel type navigation. This could be helpful in providing alternative or comparable products or as a selection for troubleshooting an existing product model.
Enabling CarouselsThe Carousel Snippet type is only supported on certain platforms and requires JSON input. Contact Quiq to enable this.
Platform Specific Content
Each messaging platform has unique capabilities that can be capitalized upon by customizing Snippet content to match the desired platform. Content in the Default tab will be sent with the Snippet unless a given platform is specifically overridden. The Quiq application understands the platform the conversation is occurring on and uses the override version of Snippets when defined for that platform. Consider overrides when you wish to specifically reference the platform being used. For example, a Facebook override may point to a Facebook page vs. a web page for other platforms.

Editing an Existing Snippet
To edit an existing Snippet, navigate to Messaging > Settings > Snippets (for individually-owned agent Snippets) or Admin > Message Catalog (for all Snippets). Find your existing Snippet and make your needed modifications, and save your changes.
To disable an existing individually-owned agent Snippet, users can navigate to Messaging > Settings > Snippets and click the trash can button for the Snippet. Admins can disable Snippets by selecting the Disable Message button for the message in the Message Catalog. Disabled Snippets can be re-enabled by an Admin by selecting the Enable Message button for the message in the Message Catalog editor.
Updated 3 months ago
